It appears that I've been bitten by the resin bug and have subsequently developed a horrendous case of resin-itis. Really, it's bad.
I've already been forced to order more Ice Resin and some new molds. I can't go anywhere without looking at various items and wondering "hmm...I wonder if I could put that in a bezel and resin it?" I've lost my sense of smell from sniffing the fumes and I think there may even be some dried resin stuck in my hair.
On the upside, I believe I've solved the "cloudiness" issue that ruined my first batch of resin molds. I still don't know what caused it, but in my latest batch - not a cloud in sight!
(Wish I could say the same for the sky outside - it is pouring BUCKETS of rain right now - which is odd for us for this time of year)
So, here are my latest results:

Okay, so, I solved the cloudiness issue and simultaneously created two new issues for myself. Awesome. I thought it would be cute to have a colored background behind these little dragonflies (btw, these are scrapbooking brads that I broke the backs off of) along with the sparkle of some holeless beads/glitter around them.
I didn't realize that the beads would migrate around to the front and under the dragonflies - still not sure how that happened since the dragonflies are heavier and were put in first. And, while a silver background was, in theory, a good idea, my silver powdered pigment actually turns out more of a dark gray when mixed with the resin and I don't really like the results. It's too dark.
But now I know - can't use that color again.

Same combo - same issues, but I do like the results here a bit better. It's still weird that the beads migrated the way they did.

These are both stickers that I mounted to card stock and then cut out - wanted to give them a bit more weight. I think the gray background atually works okay on these. Sucks that the pink flower ended up with a big ol' bubble in it.
Stupid bubbles. I hate them. I've heard passing a flame or an embossing gun over the resin before it sets will help the bubbles rise up and pop. I can see that working in bezels, but not sure it would work in the molds where everything is upside down and the bubbles tend to form UNDER the item you are embedding.
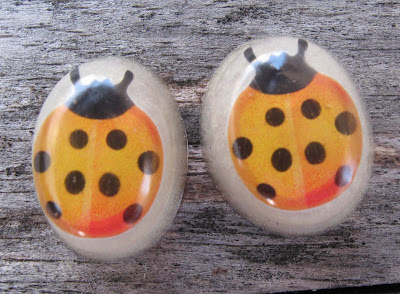
More ladybug stickers - this time I used a pale gold to mix with the resin and I'm not really happy with it, either. So, the silver is too dark and the pale gold is too light. I'm running out of colors to try LOL! But...notice...no bubbles!

More ladybugs - 1 with bubble and 1 without.

If I'd used a different background color, I'd actually be happy with these. The flowers are a sage green color and they just fade into the pale gold background.
Okay, now, this pair works. Colors contrast nicely, no cloudiness and no major bubble issues.
So, next go around, I need to really think about what's going in the molds and what background color I want to use and plan it more carefully. Once you've got the resin mixed up and colored, you kind of have to use it for everything in the molds. It's pretty hard to mix up a small enough batch to just do 2 pieces so if everything doesn't look good with the same background color, well, you're kind S.O.L.
I started another experiment last night (told you I have resin-itis) that involves neither bezels nor molds. Wonder what will happen......
Stay tuned.
KJ
P.S. What I really want to try with these molds are some tiny pressed flowers but I can't seem to find any for sale that are small enough - any suggestions? Uhh...besides making my own...been there...tried that...produced mold.


5 comments:
Hey fellow BeaD ADDICT!! FOUND YOU VIA artemesia's site. Do you know of Deryn Mentock?? She is like the Ice Resin Queen...I have emailed her and she is great in getting back to you...maybe she could help...Also the ladies at Objects and Elements...this may be old news to you, but if not worth a try...I haven't even tried ice resin yet...oh boy another addiction..the bead thing is out of control..I like buying as much as making...I spent big bucks last year on supplies...but I think thats part of it all. At least its not spending on booze or at Vegas!!! anyhow I'm gonna be a follower..
You know that you can paint the resin on paper and fabric, right? Get a little brush (the throw away kind) and try it. It works well on really really old papers because they used to contain actual linen fibers that become really transluscent. You can then tear them out with more jagged edges and then hold a flame to the edges to give them that burnt to a crisp look. Try it. Let me know what you think! Enjoy the day! Erin
Resin = extremely addictive. I wonder they don't have warnings on the package.
Suggestion: try doing your molds in 2 steps. First a layer of resin and maybe add one of your inclusions. Use your pigment in the second layer. May also be easier to get the bubbles out (they really do rise to the surface if you warm the resin).
These are great, Kelly. I really love the pink flowers and I learned a lot from your followers, Erin and Renate! Thanks for posting this. :-)
check Sherri Haab's site...she has lots of resin molds for sale...
but, you're getting there! I plan to play with putting goodies in my resin this week...I got a good batch of plain colored beads this weekend, so now I think I'll play with sticking stuff in the molds :o)
Post a Comment